
The 7 Essential Guitar Chords
Learning to play guitar? Or are you a more experienced player looking to embrace minimalism? Either way, you’ve come to the right place.
What are the 7 essential guitar chords? They include C, A, G, E, and D major plus the diminished chord and power chord. Knowing how to play these is all it takes to become a versatile guitar player. Furthermore, they allow you to perform (and compose) countless songs.
By mastering these seven chords, you will be surprised by how much you’ll be able to play. Read on to do just that.
What Makes a Guitar Chord Essential?
There is a seemingly endless number of guitar chords. It can be hard to believe that learning only seven of them will allow you to play much of anything.
In this case, the Pareto principle is highly relevant. It states:
“Eighty percent of consequences come from twenty percent of causes.”
Vilfredo Pareto, the economist after which this phenomenon is named, used it to point out how 80% of land in Italy was owned by 20% of the population. Nowadays, it’s often used in business to explain how 80% of revenue comes from 20% of the most frequent customers.
It applies to chords, too. You can play about 80% of all songs by learning 20% of all chords. If anything, 20% is an overstatement for all genres except jazz.
With seven well-chosen chords, you may find that you can play almost any song you face to completion. If not, learning one or two extra chords here and there is quite manageable.
Ultimately, we believe that learning guitar should be exciting – not frustrating.
Below, you won’t find any tricky niche chords you’ll barely use. By getting these chords down pat now, you’ll spare yourself considerable pain with each new song you learn.
Learning New Guitar Chords
Before we dive into the seven essential guitar chords, let’s explore the best strategies for learning how to play them. While none of these chords are particularly difficult, some might cause some frustration without mental fortitude (especially one in particular – that chord knows who it is).
Thus, the first step to learning essential guitar chords is practicing patience. Even the best guitarists struggled in the beginning. Despite the popular fantasy of picking up an instrument and immediately playing like a god (“I guess I’m just gifted, guys!”), great skill doesn’t happen without great effort.
So don’t beat yourself up if it takes longer than you hoped to learn each chord. It’s better to lower your expectations and find yourself pleasantly surprised.
Secondly, you’ll need to retrain your fingers.
For example, you need thick callouses to play certain chords smoothly and without pain. Then there’s building muscle memory. Looking at the fretboard and placing your fingers one by one is prohibitively slow. Instead, you want to become confident enough to play each chord like it’s a bodily function.
But again, you can only achieve such proficiency with a lot of patience.
Now, let’s get playing.
Essential Guitar Chord One: C Major
The C major chord is a classic chord. Pianists love it because it complements the C Major scale, the only major scale that uses only white keys.
While C major is a bit trickier to play on guitar, it’s by no means impossible. Once you get the hang of it, you’ll find it to be one of the most straightforward and useful chords there is.
Here’s a fretboard diagram:
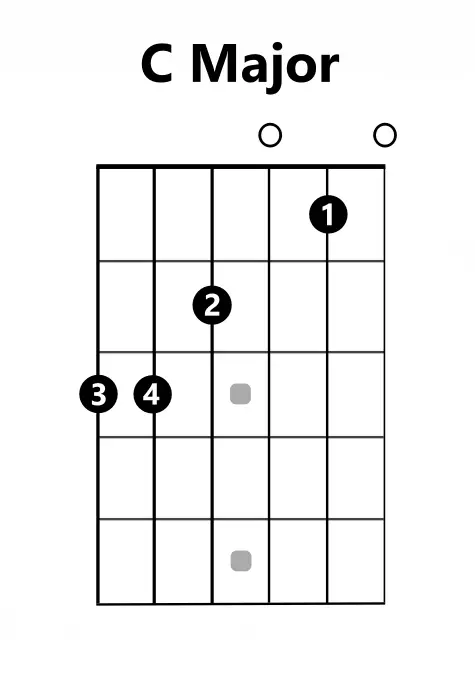
If you’ve never read a chord diagram, just imagine that your guitar is pointing upward. The top indicates the nut (where the fretboard meets the headstock).
The shaded notes tell you where to put your fingers. If you see an “X,” do not play that string. However, in the case of C major, all strings are used.
Finally, each number corresponds with a finger:
- Index finger
- Middle finger
- Ring finger
- Pinky finger
Know how to count your fingers? Good. Now let’s see our next chord.
Essential Guitar Chord Two: A Major
Second up is A major – a clean, simple chord that songwriters use extensively. It is the easiest chord to memorize of the seven essentials we discuss.
Behold its simplicity:
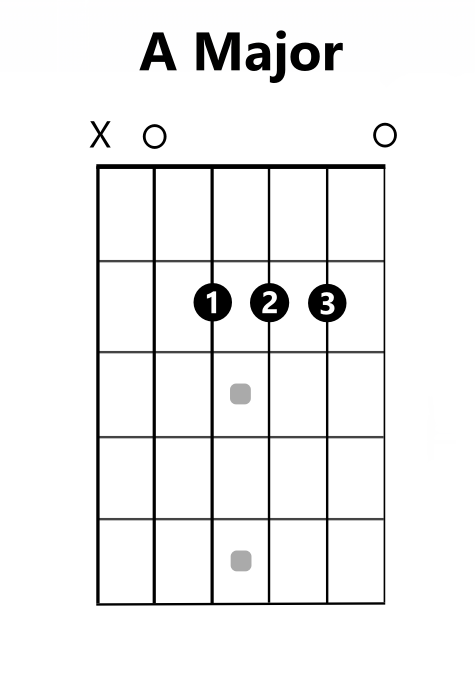
It’s as easy as 1 – 2 – 3 (pardon the cliche). The only thing you need to watch out for is the top string. You need to avoid it to play a proper A major chord, but this is easier said than done. If you do accidentally play it, it’ll still sound fine – but the low E will add extra bass which may or may not suit the song.
Essential Guitar Chord Three: G Major
More popular songs are written in G Major than in any other key. Thus, the G Major Chord will allow you to play a wide array of songs.
Here’s what is looks like:
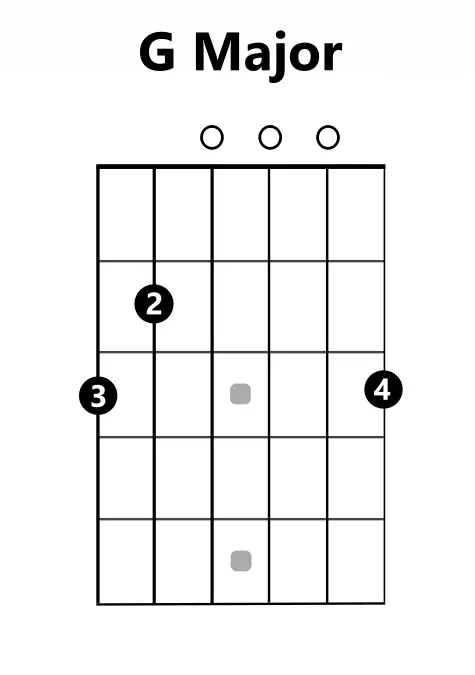
Strumming the G major chord gives off a bright, joyful sound. It is a perfect foundation for any song centered around these themes.
It’s also one of the easiest chords to play. Because a guitar with standard tuning includes the notes E-A-D-G-B-E, the root of the G chord (which is G – obviously) exists on an open string. You only need to memorize three notes and leave the remaining strings free to play unfretted.
Essential Guitar Chord Four: E Major
While G major is the most popular all-time chord, E major is the most popular guitar chord. In fact, the easiest guitar chord is E11, which you can play simply by strumming the open strings.
However, the E major chord is far more useful. Thankfully, it’s also stupidly easy.
Here’s the diagram for E major:

You leave the E, B, and high E strings unfretted. The open E strings form the root while you use your index, middle, and ring finger to play G#, B, and another E.
If you want to play E minor, it gets even more straightforward. Remove your index finger, and there you go. That’s only two notes you need to fret about (sorry), making the E major and E minor ensemble a great choice for quick and smooth chord transitions.
Essential Guitar Chord Five: D Major
The D major chord uses the fourth string from the bottom (you always count up from the thin, bottom string) as its root. Many guitarists call it “the triangle chord” because, well, look at it:
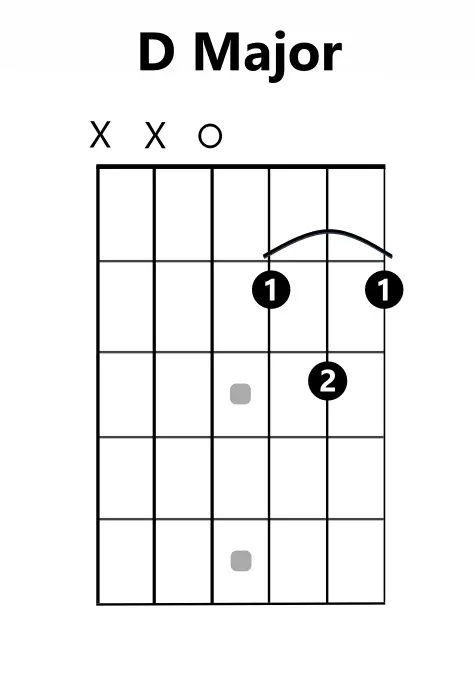
You’ll notice that the diagram states to use your index finger for two notes. This is a basic barre, meaning you’ll rest your finger along several strings – the G, B, and little E strings in this instance.
To play it, position your fingers as shown on the bottom three strings. Then, strum down from the open D. Do not sound the top two strings.
You can also use an upstroke and start with the thin E string –be careful to stop yourself at D. If you find this challenging, consider resting your thumb lightly on the top two strings to mute them.
Other than that, the D major chord is one of the easiest chords you’ll encounter. To transform it into a minor chord, move your index finger to the first fret on the thin E string. Then, slide your middle finger to replace its spot on the G string.
Essential Guitar Chord Six: Diminished Chord
Every major and minor scale includes a diminished chord. It’s half a step down from the root note on a major scale. It’s one and a half steps up from the root note of a minor scale.
You won’t come across diminished chords as frequently as major and minor chords. Nevertheless, learning to play it will keep you from being caught off guard. Fortunately, you can apply one position for every note, regardless of the song’s key.
Here’s that position:
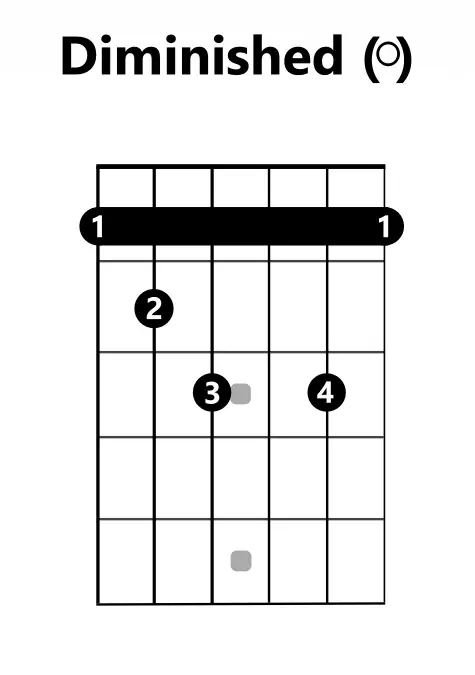
Your index finger barres all strings. The thick E string is the root note. Thus, if you barre the third fret, that’s G diminished. If you start on the 0th fret (the nut) and leave the strings open, that’s E diminished.
There’s no doubt that the diminished chord is one of the trickier ones to play. But remember, you won’t need to use it all that often. Most guitar-playing songwriters don’t want to screw with it, either.
Nevertheless, it’s worth adding to your chord arsenal. The diminished chord is particularly useful in bridges, where a song undergoes structural changes. It also helps break up the monotony of major and minor chords.
Essential Guitar Chord Seven: Power Chord
The chords above are perfectly suitable in almost all playing scenarios. They’re not difficult, yet they’re still a bit convoluted when speed is your top priority.
To play at lightning speed, simplicity is key. This is the secret behind blazing-fast rhythm guitar in punk, hard rock, and heavy metal. Power chords fill this role perfectly.
Let’s start with the simplest power chord:
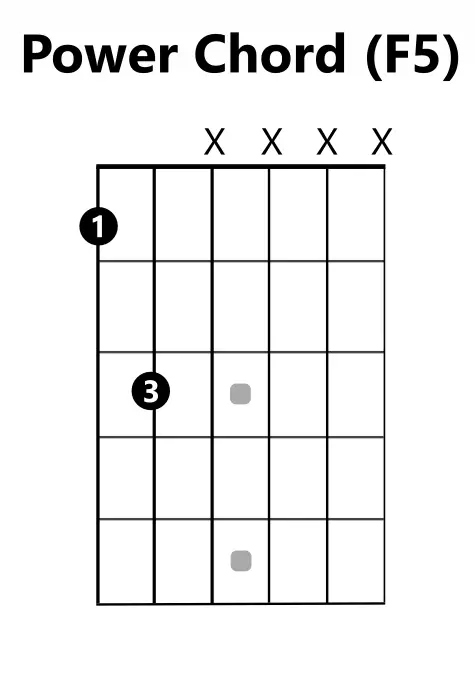
Two notes, two strings – it doesn’t get easier. But perhaps you’d like to make it sound a bit fuller. If so, add the octave. Play the same pattern but place your pinky on the next string down, directly next to your ring finger.
With this one chord, you are equipped to play a wide array of hard rock, metal, and punk songs. Furthermore, you can now perform almost any Green Day song with ease.
Now the challenge is not finger placement, but raw speed. Think about freezing your finger into a claw to minimize the need to readjust. For inspiration, look to power chord champions such as Tony Iommi, James Hetfield, Steve Jones, and many others.
What is the CAGED System on Guitar?
Look again over the first five chords. Notice something? They spell out the word “caged.”
CAGED is an acronym of sorts to describe how all these chords – C, A, G, E, and D major – work together. Despite the word’s meaning, the CAGED system opens new freedoms and by no means boxes you into anything.
You might notice that B and F are absent from the group. Rest assured, the CAGED system won’t leave you stranded.
So, what is the CAGED system? The CAGED system allows you to apply the chord shapes we discussed to play in any key you wish. With these five chords, you can play anything – including sharps, flats, and minor scales.
All you need to do is turn one of these chords (your choice) and move it down the neck. To illustrate, let’s take E major and shift it down one fret.
Here’s the E major chord again if you need a refresher:
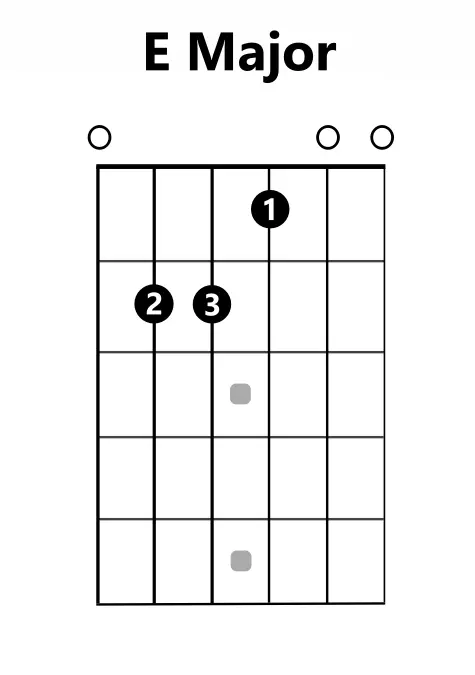
Notice how there are three open strings. When you slide down, the nut doesn’t move with you. Thus, the note intervals will change.
But we need to maintain the note intervals if we want the chord to sound right. To do this, your index finger needs to “barre” the strings. Think of your finger as a bar coming down to lock the strings at the first fret.
Now it is an F major chord:
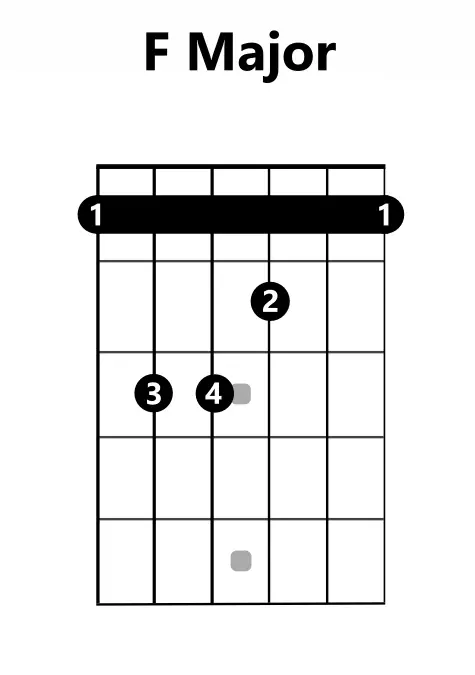
All you did was slide the root down a fret and shift your fingers to maintain the shape. If you repeated the process on the second fret, you’d get F sharp major. Down another, you’d get a G major. Down another… you get the idea.
The only caveat with moving chords down is replacing your index finger’s spot (now that it’s a barre and all). Use your middle finger in place of your index, your ring in place of your middle, and bring your pinky in to take the place of your ring finger.
Let’s do one more.
Hmm… How about… turning A major into B minor.
Again, here’s the A major chord.

Now, we shift it down to B. Because going from A to B is a whole step, we shift down two frets instead of one.
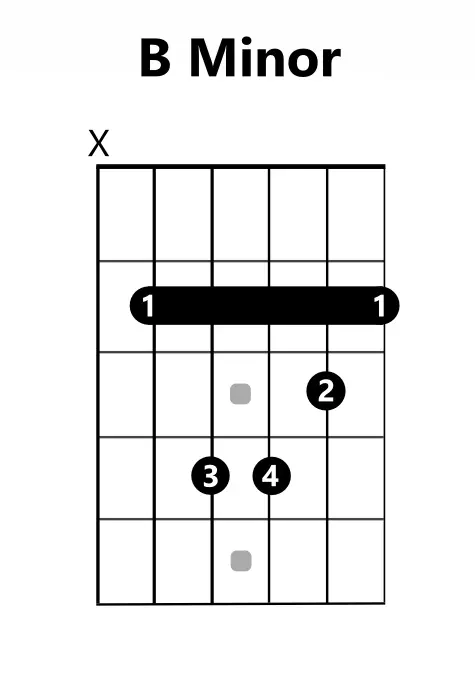
Notice how one note remains one fret higher than the others. Because we’re playing a minor chord, the major third (where the ring finger was in A major) slides back to create a minor third.
Practice alternating between B minor and B major to hear the difference.
Other Useful (But Non-Essential) Chords
While you can tackle almost any piece with the seven essential chords, there’s nothing wrong with learning more. This is especially true with jazz. Jazz uses a buttload of chords.
Here are some useful ones to add to your toolkit:
The Seventh Chord
Striking a seventh chord is a great way to add country twang to a melody. Understandably, it appears frequently in country, bluegrass, and folk genres.
There are major and minor seventh chords, each imparting a different feel.
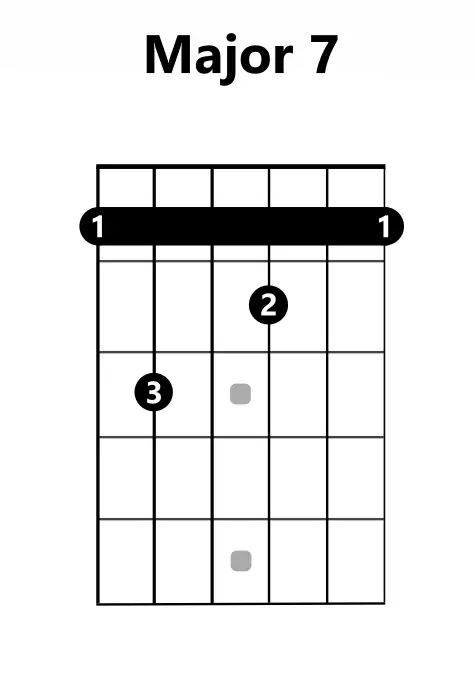
Here’s a major seventh barre chord:
And here’s a minor seventh barre chord:
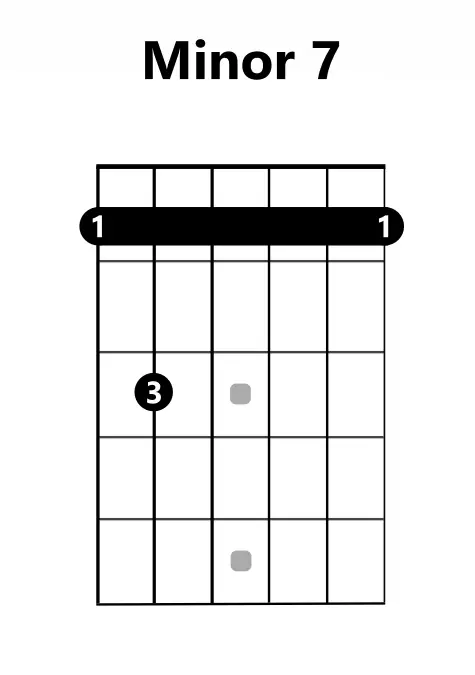
As you can see, they follow a similar pattern to standard major and minor chords. However, they include an extra note – the seventh. Maybe that’s where they get their name…
Anyway, a seventh is the note before the root. With a minor chord, the seventh is one whole step before the root. Meanwhile, a major chord’s seventh is a half-step (one fret) before the root.
The Eleventh Chord
Strum the open strings of your guitar.
Congratulations. You have mastered the E11 chord.
What if you want to play, say, a C11 chord? Lay your index finger across the 8th fret to barre the strings. Now strum. There you go.
The eleventh chord is one of the most straightforward chords you can play on the guitar. Unfortunately, it isn’t used as frequently as you’d think. But you can change that by using eleventh chords in your songwriting.
The eleventh chord is best suited as an accent chord rather than one you’d strum repeatedly. However, it truly shines as an accent chord. Ending a verse on an eleventh chord gives your song a soothing “time to stare off into space and reminisce” feeling.
Now’s a good time to mention the importance of accent chords. You won’t use them frequently – but that’s for the better. When you do choose to throw in an atypical chord, such as the eleventh, you take your listeners by surprise and facilitate truly unique melodies.
Conclusion
Five major chords and two “miscellaneous” chords form the seven essential guitar chords. These are all you need to become an excellent guitarist.
“Less is more” is the primary principle behind the seven essential chords. Minimalism makes learning (and writing) new songs much more enjoyable. Spending hours learning new chords for each song is monotonous and unnecessary.
The CAGED system allows easy modification of five basic shapes to play in any key – including sharps and flats. Then, sliding one finger up a fret allows you to play all minor chords.
If these chords aren’t enough, chances are a diminished chord will fill in the gap. Like every other chord of the essential seven, you can play it in any key you wish.
And if you’d like to take an even more minimalist approach, consider power chords. Power chords consist of two to three notes. Their simplicity makes them perfect for lightning-fast riffs.
Now you and your guitar are ready for almost anything.